How to Clone an Existing WordPress Website
WordPress is a widely used content management system. At some point, you may want to clone your existing WordPress website—whether for testing, staging, or launching it under a new domain name. This article walks you through how to clone your WordPress website step by step. Important: Before you begin, we strongly recommend creating a full backup of your website. The following steps involve sensitive file and database changes.
Why Clone a WordPress Website?
Here are some common reasons why cloning a WordPress website may be beneficial:
- Development and Testing: Try new themes, plugins, or custom code changes without affecting your live site.
- Backup and Recovery: Maintain a clone for backup purposes in case of site issues or data loss.
- Staging Environment: Use a cloned copy to test updates or redesigns before deploying them live.
- Migration: Move your website to a new hosting provider or server without downtime.
- Client Projects: Developers can use a cloned base site to streamline the setup process for new clients.
- Team Collaboration: Give contributors or team members their own cloned instance to work on content independently.
How to Clone an Existing WordPress Website
Step 1: Copy Website Files to the New Domain Folder
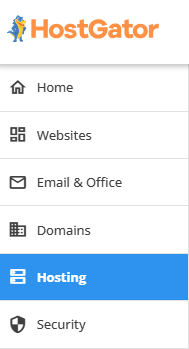
- Log in to your Customer Portal.
- Then select Hosting from the left menu.
- Select the Hosting package you want to manage:
- If you have multiple Hosting packages on your account , click the MANAGE button on the Hosting package you want to manage.
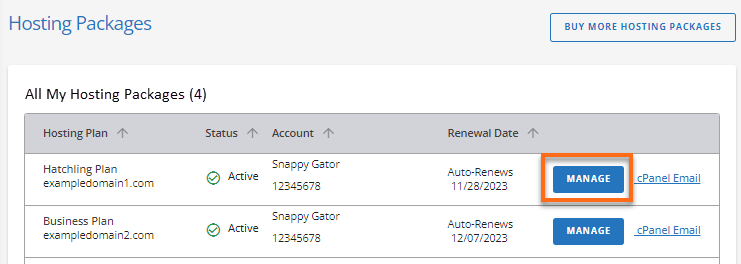
- If you only have a single Hosting package on your account , you will be rerouted to the Hosting Overview page.
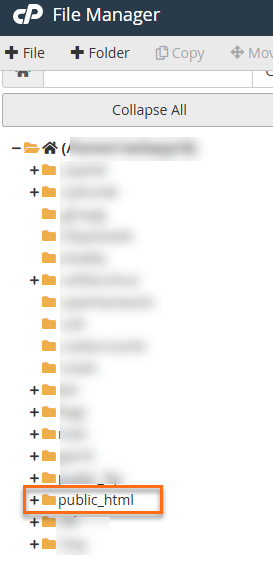
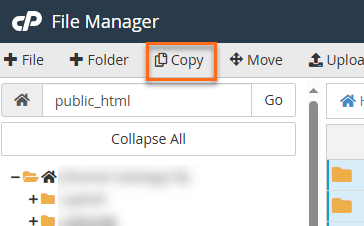
- Scroll down to Quick Links , then select File Manager.

- Go to the public_html folder.
- Click Select All at the top of the File Manager.
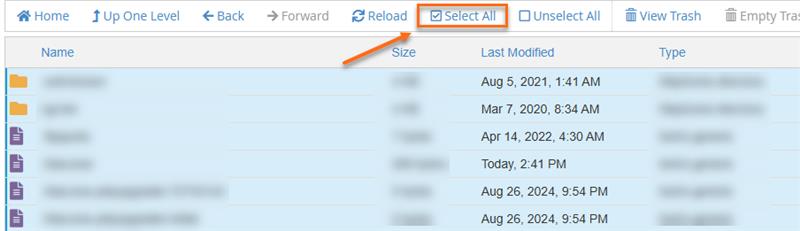
- Hold down the Ctrl key and unselect the following:
- .qidb
- cgi-bin
- Your addon domain folder (if applicable)
- Click Copy in the top menu.
- In the popup path box, enter the addon domain folder:
Example: /public_html/addondomainexample.com
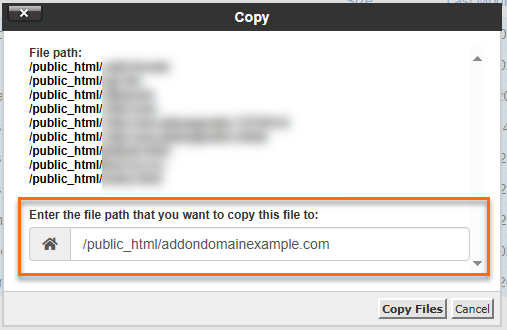
- Click Copy File(s) to complete the operation.
Step 2: Create a New MySQL Database
After copying the files to your addon domain directory, open the MySQL Database Wizard in cPanel on a different screen. This is where you will create a new MySQL database.
Step 3: Update the wp-config.php File
- In File Manager , locate the folder you created for your addon domain.
- Find the wp-config.php file and right-click to select Edit.

- Update the following values to match the new database information that you created from Step 2 : ```
define('DB_NAME', 'new_db_name'); define('DB_USER', 'new_db_user'); define('DB_PASSWORD', 'new_db_password');
4. Click **Save Changes.**
### Step 4: Export and Import the Database
Export the database from the main domain and import it into the newly established database. For assistance with this procedure, please refer to the following articles:
* Exporting a MySQL Database via phpMyAdmin
* How to Import Your MySQL Database
### Step 5: Update Domain Information in the Database
1. Log in to your Customer Portal.
2. Then select **Hosting** from the left menu.

3. Select the Hosting package you want to manage:
* **If you have multiple Hosting packages on your account** , click the **MANAGE** button on the Hosting package you want to manage.

* **If you only have a single Hosting package on your account** , you will be rerouted to the **Hosting Overview** page.
4. Scroll down to **Quick Links** , then select **CPANEL**.

5. In the cPanel home page, navigate to the **Databases** section and click the **phpMyAdmin** icon.

6. In **phpMyAdmin** , go to your **new database**.

7. Click the **wp_options** table.

8. Click **Edit** next to the **siteurl** and **home** rows. Replace the old domain with the new one (e.g., https://yournewdomain.com). Click **Go** after each update.

You can also update the **blog name** and **description** in this same table if desired.
### Step 6: Search and Replace Old URLs in the Database
After your domain is set up, you can access the WordPress Dashboard of your new site and install the Search and Replace plugin. This tool enables you to search through all database tables for your old domain and replace it with a new one. You can remove the plugin once the database has been updated. Additionally, be sure to inspect your site for any links that may be hard-coded into widgets or other areas, as these will need to be updated manually to point to your new site address.
For more details on utilizing this plugin, check out the article: Using the Better Search and Replace Plugin.
### Step 7: Update WordPress General Settings
1. Login to your WordPress Dashboard.
2. From the Dashboard, go to **Settings > General**.

3. Make sure the following fields reflect the new domain name:

1. **WordPress Address (URL)**
2. **Site Address (URL)**
4. Scroll down and click **Save Changes**.
Cloning your existing WordPress website can be incredibly helpful for development, backup, migration, or client site setup. This guide provided a step-by-step walkthrough of how to clone your WordPress site by copying files, creating a new database, updating configuration settings, and using the Better Search Replace plugin for a seamless domain transition.